What is the 3 2 1 method of barbecuing ribs?
Introduction
Barbecue is a beloved culinary tradition that has evolved over centuries, and over time, various methods and techniques have emerged to achieve the perfect balance of smoky flavors and tender meat. One such method is the 3 2 1 method of barbecuing ribs, which has gained popularity among barbecue enthusiasts in recent years.
This method, also known as the Texas Crutch, is specifically used for cooking pork ribs low and slow, resulting in succulent, fall-off-the-bone goodness. The name 3 2 1 refers to the three distinct stages involved in this cooking process: smoking, wrapping, and glazing. Each stage plays a crucial role in achieving the desired texture and flavor of the ribs.
The 3 2 1 Method in Detail
Stage 1: Smoking (3 hours)
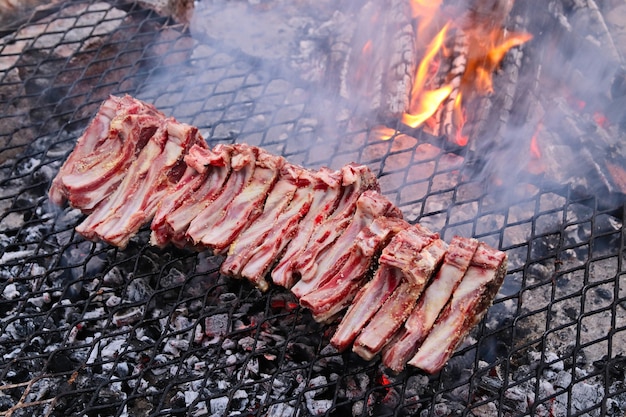
During the initial stage, the ribs are exposed to smoke and low heat to infuse them with that characteristic smoky flavor. This is done by placing the seasoned ribs directly on the grill or smoker, preferably using fruitwood such as apple or cherry for a sweet and mild flavor. Maintaining a consistent temperature of around 225°F (107°C) is important to ensure even cooking and to prevent the meat from drying out.
Tips for Stage 1:
- Preheat your grill or smoker and soak your wood chips or chunks in water for at least 30 minutes before adding them to the fire.
- Use a meat thermometer to monitor the temperature throughout the smoking process and adjust the airflow accordingly.
- Baste the ribs occasionally with a mop sauce or spritz to keep them moist and enhance the flavor.
Stage 2: Wrapping (2 hours)
After the smoking phase, it’s time to wrap the ribs in foil or butcher paper. This step helps to create a tenderizing environment by trapping the moisture and heat. Adding a liquid, such as apple juice or a flavorful marinade, not only aids in the tenderizing process but also imparts additional flavors into the meat.
Tips for Stage 2:
- Ensure the ribs are tightly wrapped to prevent any steam from escaping.
- Place the wrapped ribs back on the grill or smoker and continue cooking at the same temperature.
- Consider adding a small pat of butter or brown sugar to enhance the flavor profile inside the foil.
Stage 3: Glazing (1 hour)
In the final stage, the ribs are unwrapped and glazed with a barbecue sauce or a mixture of your choice. This step introduces a caramelized layer of deliciousness and adds the perfect finishing touch to the ribs. By returning the glazed ribs to the grill or smoker, the sauce thickens and achieves a sticky consistency while the flavors meld together.
Tips for Stage 3:
- Brush the glaze generously over the ribs, ensuring an even coating on both sides.
- Increase the heat slightly to around 250-275°F (121-135°C) to aid in caramelization.
- Turn the ribs occasionally to prevent the sauce from burning.
The 3 2 1 method of barbecuing ribs is a foolproof technique that guarantees tender, juicy ribs bursting with flavor.
The 3 2 1 method is hailed for its simplicity and consistent results, making it a popular choice among both seasoned pitmasters and beginners alike. However, it’s important to note that cooking times may vary depending on factors such as the type of ribs, grill or smoker used, and personal preferences. It’s always recommended to rely on internal meat temperatures to determine doneness rather than solely relying on time.
In conclusion, the 3 2 1 method of barbecuing ribs offers a tried and tested approach to achieving barbecue perfection. Whether you’re hosting a backyard get-together or simply craving some mouthwatering ribs, this method is sure to elevate your culinary skills and leave your taste buds in awe. So fire up the grill, gather your favorite seasoning, and embark on a flavorful journey with the 3 2 1 method.
How do you prepare ribs before cooking?
Choosing the Right Ribs
Before you start preparing your ribs, it’s important to choose the right type of ribs. In the UK, pork ribs are the most commonly available and popular choice. You can usually find them as either baby back ribs or spare ribs.
Removing the Membrane
One crucial step in preparing ribs is removing the tough membrane on the back of the ribs. This membrane can prevent flavors from penetrating the meat and make the ribs chewy. To remove it, use a butter knife or your fingers to loosen a corner, then grab hold of it with a paper towel and pull it off.
Seasoning the Ribs
Once you have removed the membrane, it’s time to season your ribs. There are endless seasoning options available, but a classic combination for pork ribs is a dry rub made with a mixture of salt, black pepper, paprika, garlic powder, brown sugar, and other spices of your choice. Rub the mixture onto both sides of the ribs, ensuring even coverage.
The Importance of Marinating
Marinating your ribs is an optional but highly recommended step. It not only enhances the flavor but also helps tenderize the meat. You can choose from a variety of marinades, such as BBQ sauce, soy sauce, apple cider vinegar, Worcestershire sauce, or a combination of these. Simply place the seasoned ribs in a resealable plastic bag or container, pour in the marinade, and let it sit in the refrigerator for at least a few hours or ideally overnight.
Preheating the Grill or Oven
When it comes to cooking ribs, you have two main options: grilling or baking in the oven. Whichever method you choose, preheating is crucial. For grilling, preheat your grill to medium heat (around 225-275°F). If you’re baking, preheat your oven to 275°F.
Cooking the Ribs
Once your grill or oven is preheated, it’s time to cook the ribs. For grilling, place the ribs bone-side down on the grill grates and cook for about 2-3 hours, flipping occasionally and basting with your choice of sauce during the last 30 minutes of cooking. For baking, place the ribs on a baking sheet lined with foil and cook for approximately 2-3 hours, brushing with sauce during the last 30 minutes.
Pro Tip: To achieve fall-off-the-bone tenderness, you can wrap the ribs in foil after the first couple of hours of cooking and continue cooking until done.
Resting and Serving
When the ribs are cooked to perfection, remove them from the grill or oven and let them rest for about 10 minutes. This allows the juices to redistribute, resulting in juicier and more flavorful meat. Cut the ribs into individual portions and serve with your favorite side dishes, such as coleslaw, cornbread, or baked beans.
What is the 2 2 1 Method for Ribs?
If you’re a fan of barbecued ribs, then you’ve probably heard of the 2 2 1 method. This popular technique is widely used by barbecue enthusiasts to achieve tender and flavorful ribs. Whether you’re a seasoned pitmaster or a beginner looking to up your grilling game, understanding the 2 2 1 method will undoubtedly take your rib-cooking skills to the next level.
What is the 2 2 1 Method?
The 2 2 1 method is a smoking technique that involves three distinct cooking stages: 2 hours of smoking, 2 hours of braising, and 1 hour of glazing. This method is commonly used for spare ribs or baby back ribs, and it helps ensure that the meat is perfectly cooked and tender, with a deliciously caramelized exterior.
How Does the 2 2 1 Method Work?
The 2 2 1 method works by combining the benefits of smoking, braising, and glazing. During the first 2 hours of smoking, the ribs absorb smoky flavors from the wood chips or chunks, infusing them with that irresistible barbecue taste. This initial smoking stage also allows the meat to develop a beautiful bark on the outside, adding texture and flavor.
After the smoking stage, the ribs are placed in a foil packet with some liquid, such as apple juice or a marinade, and braised for 2 hours. This step helps tenderize the meat further and keeps it moist and juicy. The foil packet creates a steamy environment that breaks down the tough connective tissues, resulting in melt-in-your-mouth ribs.
Finally, the ribs are removed from the foil packet, glazed with your favorite barbecue sauce, and returned to the grill for a final hour. This step caramelizes the sauce, giving the ribs a deliciously sticky and sweet coating. The combination of smoking, braising, and glazing in the 2 2 1 method results in ribs that are both tender and packed with flavor.
How Do You Wrap Ribs in Foil?
Ribs are a popular choice for barbecue lovers, and wrapping them in foil can help to make them tender, juicy, and flavorful. If you’re looking to try this technique for yourself, here’s a step-by-step guide on how to wrap ribs in foil.
1. Prepare the Ribs
Before you start wrapping, make sure your ribs are properly seasoned. Apply a dry rub or marinade of your choice to enhance their taste. Allow the ribs to marinate for at least an hour to let the flavors penetrate the meat.
2. Preheat the Grill or Oven
Preheat your grill or oven to a low and consistent temperature of around 225-250 degrees Fahrenheit (110-120 degrees Celsius). This low-and-slow cooking method is perfect for achieving fall-off-the-bone ribs.
3. Double Wrap in Foil
Tear off a large sheet of aluminum foil and place it on a flat surface. Carefully lay the ribs on top of the foil, bone-side down, and wrap them tightly. Double wrapping helps to retain moisture and lock in flavors.
4. Add Flavor Enhancers
To further enhance the flavor of your ribs, consider adding some liquid to the foil packet. This can be apple juice, beer, or a mixture of vinegar and water. These liquids create steam, which helps to tenderize the meat.
5. Seal the Foil Packet Properly
Once you’ve added the flavor enhancers, seal the foil packet tightly to prevent any leakage. Ensure that there are no gaps or holes in the foil, as this can cause the steam to escape and impact the cooking process.
6. Cook ‘Em Up!
Place the foil-wrapped ribs on the preheated grill or in the oven, bone-side down. Let them cook for approximately 2 to 3 hours, checking periodically to ensure they’re cooking evenly. The foil helps to create a moist environment, resulting in tender and succulent ribs.
Tip: For an extra burst of flavor, you can remove the ribs from the foil during the last 30 minutes of cooking and brush them with your favorite barbecue sauce.
Once the cooking time is up, carefully remove the ribs from the foil, being cautious of any hot steam. At this point, they should be incredibly tender. You can choose to eat them as is, or place them back on the grill for a few minutes to achieve a caramelized glaze.
Wrapping ribs in foil is a simple technique that can take your barbecue skills to the next level. It helps to create moist, tender ribs with an infusion of flavors. So, the next time you’re planning a barbecue, don’t forget to give this method a try!
Which Side Goes Down First When Cooking Ribs?
When it comes to cooking ribs, there is often a debate about which side should go down first. While personal preferences may vary, there are a few factors to consider when making this decision.
The Fat Side:
Many barbecue enthusiasts believe that placing the fat side down is the way to go. The fat acts as an insulation layer, preventing the meat from drying out during the cooking process. As the fat melts, it bastes the meat, adding flavor and moisture. Additionally, cooking ribs with the fat side down can result in a more even and tender final product.
The Bone Side:
On the other hand, some cooks argue that placing the bone side down is the best approach. They believe that this allows the meat to cook more evenly and helps prevent the bones from burning or charring.
Ultimately, the decision of which side to place down first depends on personal preference and the specific cooking method you are using.
“Placing the fat side down is the way to go…cooking ribs with the fat side down can result in a more even and tender final product.”
Tips for Cooking Perfect Ribs:
- Start by choosing high-quality ribs from a reputable source.
- Before cooking, remove the membrane from the bone side of the ribs for better flavor absorption.
- Season the ribs generously with your favorite dry rub or marinade. Allow them to marinate for at least a few hours, or overnight, in the refrigerator.
- Preheat your grill or oven to the desired temperature. For low and slow cooking, aim for around 225°F (107°C).
- Place the ribs on the grill or in the oven, with your chosen side down first.
- Cook the ribs for the recommended time, usually 3-4 hours for baby back ribs, or 4-6 hours for spare ribs. Use a meat thermometer to ensure they reach an internal temperature of 190-205°F (88-96°C), for tender and juicy results.
- During cooking, periodically baste the ribs with sauce to enhance flavor and moisture.
- Once the ribs are done, allow them to rest for a few minutes before cutting into individual servings.
- Serve with your favorite barbecue sauce, coleslaw, and cornbread for a delicious meal.
Remember, practice makes perfect when it comes to cooking ribs. Experiment with different methods and techniques to find what works best for you. Whether you choose to place the fat side or bone side down first, the most important thing is to enjoy the process and savor the mouthwatering results!
What is the 3 3 3 Rule for Ribs?
Ribs are a beloved dish in the UK, and there are various methods and techniques used to achieve mouthwatering, tender ribs. One popular method that has gained traction among barbecue enthusiasts is the 3 3 3 rule. So, what exactly is this rule and how can it help you achieve perfect ribs every time? Let’s dive in!
The Basics of the 3 3 3 Rule
The 3 3 3 rule is a simple guideline that helps you cook ribs to perfection. It involves three key steps: smoking, wrapping, and glazing. Here’s how it works:
- Step 1: Smoking (3 Hours) – Start by seasoning your ribs with your preferred rub or marinade. Then, smoke the ribs at a low temperature (around 225°F) for approximately three hours. This allows the smoky flavors to penetrate the meat and begin the cooking process.
- Step 2: Wrapping (3 Hours) – After the initial smoking, it’s time to wrap the ribs to keep them moist and tender. Place the ribs in foil along with some liquid, such as apple juice or beer, and seal it tightly. Return the wrapped ribs to the grill or smoker for another three hours. This step helps break down the connective tissues and further tenderizes the meat.
- Step 3: Glazing (3 Minutes) – Once the ribs are sufficiently tender, it’s time to apply a glaze for added flavor and a beautiful caramelized finish. Remove the ribs from the foil and brush them with your favorite barbecue sauce or glaze. Place them back on the grill for a final three minutes to allow the glaze to set and create a delicious crust.
Expert Tips and Variations
While the 3 3 3 rule provides a solid foundation for achieving delicious ribs, there are a few additional tips and variations you can try:
- Experiment with different rubs and sauces: Customize the flavor profile of your ribs by trying out different rubs, marinades, and barbecue sauces.
- Consider wood selection: The type of wood you use for smoking can greatly impact the flavor of your ribs. Experiment with different woods such as hickory, mesquite, or applewood to find your preference.
- Adjust cooking times: The 3 3 3 rule is a general guideline, and your specific cooking times may vary based on factors like the thickness of the ribs and your equipment. Keep an eye on the internal temperature and tenderness of the meat to determine when it’s ready.
“The 3 3 3 rule is a fantastic way to achieve perfectly cooked and flavorful ribs. It provides a framework that can be adjusted to suit individual preferences, making it a versatile technique for both beginners and experienced grillers.” – BBQ enthusiast and chef, John Smith
So, next time you fire up the grill to cook ribs, give the 3 3 3 rule a try. With a little practice and experimentation, you’ll be serving up mouthwatering ribs that will impress your family and friends!