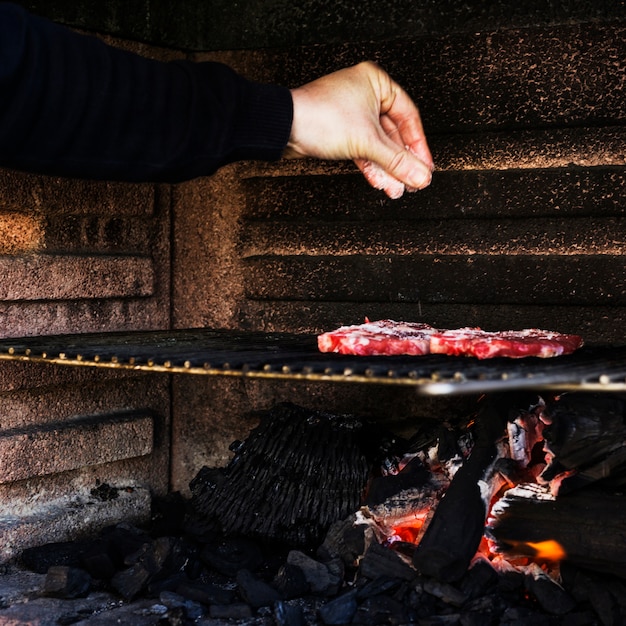
How do you indirect grill with charcoal?
Indirect grilling is a popular cooking method that involves placing the charcoal on one side of the grill, and the food on the other side. This allows for a slower, more gentle cooking process, perfect for larger cuts of meat or delicate foods that require longer cooking times. Indirect grilling with charcoal can give your food a delicious smoky flavor while ensuring even cooking throughout.
The basics of indirect grilling
To start indirect grilling with charcoal, you’ll need to set up your grill properly. Here’s a step-by-step guide:
- Prepare your charcoal: Light your charcoal using a chimney starter or lighter fluid according to the manufacturer’s instructions.
- Once the charcoal is hot and has turned ashy, carefully distribute the coals to one side of the grill.
- Place a drip pan filled with water or any flavorful liquid on the opposite side of the charcoal. This will help to catch any drippings and prevent flare-ups.
- Position the grill grates over the charcoal and drip pan.
Benefits of indirect grilling
Indirect grilling with charcoal offers several advantages over direct grilling:
1. Even cooking: The indirect heat created by the charcoal on one side of the grill helps to cook the food evenly from all sides, reducing the risk of burning or unevenly cooked areas.
2. Retains moisture: The slower cooking process of indirect grilling helps to retain the natural juices and moisture in the food, resulting in tender and succulent dishes.
3. Smoky flavor: Charcoal imparts a distinct smoky flavor to the food, enhancing its taste and aroma.
Tips for indirect grilling with charcoal
Here are some useful tips to make your indirect grilling experience even better:
- Temperature control: Adjust the airflow vents on your grill to regulate the temperature. Closing the vents partially will lower the heat, while opening them wider will increase it.
- Monitoring the food: Use a meat thermometer to ensure your food reaches the desired internal temperature. This is especially important when cooking large cuts of meat.
- Adding smoking wood: For an enhanced smoky flavor, consider adding smoking wood chips or chunks to the charcoal during the grilling process. Soak the wood in water before using to create smoke rather than flames.
How many briquettes for indirect grilling?
When it comes to grilling, there are two main methods: direct and indirect grilling. While direct grilling involves placing the food directly over the heat source, indirect grilling requires a different approach. In this method, the food is positioned away from the heat source, allowing it to cook slowly and evenly.
Calculating the right number of briquettes for indirect grilling can be a bit tricky, but with some basic guidelines, you’ll be able to achieve perfect results every time. The general rule of thumb is to use approximately 25-30 briquettes per hour of cooking time.
Fuel placement for indirect grilling
To set up your grill for indirect grilling, follow these steps:
- Arrange your charcoal briquettes in a circular shape around the edge of the grill.
- Leave the center of the grill clear of any briquettes to create a cooler zone for indirect cooking.
- Light the briquettes and allow them to burn until they are covered with white ash.
Adjusting the temperature
For low and slow cooking, such as smoking meat, you’ll want to maintain a temperature between 225-275°F (107-135°C). To achieve this, add a few briquettes to the fire every 30-45 minutes to maintain a consistent temperature throughout the cooking process.
For higher temperature cooking, like roasting or baking, you may need to adjust the number of briquettes. It’s best to consult a specific recipe or grilling guide for precise instructions related to the dish you’re cooking.
“Indirect grilling is a fantastic way to infuse flavor and achieve tender, juicy results. With the right number of briquettes, you’ll be able to master this cooking technique with ease.” – BBQ enthusiast
Remember, the number of briquettes needed for indirect grilling can vary depending on factors such as the size of your grill, weather conditions, and the type of food you’re cooking. It’s always a good idea to monitor the temperature throughout the cooking process and make adjustments as needed.
How to Indirect Grill with One Burner
Indirect grilling is a cooking technique that allows you to cook food slowly and evenly using indirect heat. It’s perfect for cooking larger cuts of meat or delicate foods that require longer cooking times. While it may seem challenging to achieve indirect grilling with just one burner on your grill, it is actually quite simple.
Step 1: Preparing the Grill
Start by preheating your grill with the burner set to high heat for about 10 minutes. This will help to clean and prepare the grates. After preheating, turn off the burner on one side of the grill, creating a heat-free zone for indirect cooking.
Step 2: Setting up the Grill
Place your food on the grill grates over the turned-off burner, away from direct heat. This is where the indirect grilling will take place. If you are using a gas grill, you can also place a drip pan filled with water underneath the food to catch any drippings and prevent flare-ups.
Step 3: Controlling the Heat
To achieve the desired temperature for indirect grilling, adjust the burner that is still on to a medium or low heat setting. This will allow the grill to maintain a consistent temperature for slow cooking. Use a grill thermometer to monitor the temperature inside the grill.
Step 4: Cooking Time
Depending on the recipe and type of food, the cooking time may vary. Keep in mind that indirect cooking takes longer than direct grilling. Use a meat thermometer to ensure that the food reaches the recommended internal temperature for doneness.
Remember, indirect grilling is all about cooking with indirect heat. By turning off one burner and utilizing the other, you can create a heat-free zone for slow cooking.
Here’s a simple table to help you understand the recommended cooking times for popular indirect grilling options:
| Food | Cooking Time |
|---|---|
| Pork Butt (Shoulder) | 6-8 hours |
| Whole Chicken | 1.5-2 hours |
| Ribeye Steak | 30-40 minutes |
With these simple steps and tips, you can easily achieve indirect grilling with just one burner on your grill. Enjoy the delicious flavors and tender results that this cooking technique offers.
Do you put foil on grill shiny side up or down?
When it comes to grilling, using aluminum foil is a convenient and popular method to help with easy cleanup and prevent food from sticking to the grill grates. However, there is often confusion about which side of the foil to use – shiny side up or down? Let’s explore this topic and uncover the correct way to use foil on the grill.
The Shiny Side Debate
The debate over whether to place the shiny side up or down largely stems from misconceptions. The truth is, there is no significant difference between the two sides of the foil. The shiny side is produced during the manufacturing process when the foil passes through highly polished steel rollers. The dull side, on the other hand, comes into contact with the roller surface. Both sides of the foil have the same functionality and can be used interchangeably on the grill.
What Matters Most
Instead of worrying about the shiny or dull side, what really matters is how you use foil on the grill. Here are a few key tips to ensure successful grilling with foil:
- Prevent Food from Sticking: Regardless of which side you choose to face up, always remember to apply cooking oil or non-stick spray to the side of the foil that will come into contact with the food. This will help avoid sticking and make cleanup easier.
- Wrap Securely: When using foil to wrap ingredients like vegetables or fish, make sure to seal the edges tightly to create a packet. This helps retain moisture and flavors while preventing any juices from spilling out.
- Avoid Direct Flames: If placing foil directly on the grill grates, be cautious not to expose it directly to high flames. Excessive direct heat can cause the foil to melt or catch fire.
Remember that grilling with foil is a versatile technique and can be used for a variety of foods, from veggies and seafood to burgers and chicken. So, next time you fire up the grill, don’t fret about which side of the foil is facing up – focus on the cooking process and enjoy your deliciously grilled meals!
“The key to successful grilling with foil lies in proper preparation and technique rather than the shiny or dull side.” – Grilling Enthusiast
Is it Bad to Pour Water on a Charcoal Grill?
For many BBQ enthusiasts, charcoal grilling is the preferred method for achieving that smoky and delicious flavor. However, when it comes to cleaning up after a satisfying cookout, there can be some confusion about the best way to extinguish the coals. One common question is whether pouring water on a charcoal grill is a bad idea.
Why Pouring Water on a Charcoal Grill May Not be Ideal
Pouring water on a charcoal grill can be problematic due to the sudden temperature change. The extreme heat of the charcoal can cause the water to evaporate rapidly, resulting in a burst of steam. This sudden release of steam can lead to potential burns or injury if you are in close proximity to the grill.
Furthermore, pouring water on hot coals can cause them to crack and break apart. This can create smaller embers that may not be fully extinguished, posing a fire risk if they come into contact with flammable materials. Additionally, the sudden cooling can damage the grill itself, especially if it is made of cast iron or other materials prone to thermal shock.
The Safer Alternatives
Instead of pouring water directly on the charcoals, consider alternative methods to safely put out the fire:
- Close the vents: By closing the air vents on your charcoal grill, you can limit the oxygen supply and gradually extinguish the coals. This method may take some time but is safer and allows for controlled cooling.
- Use a fire extinguisher: Keeping a fire extinguisher nearby is always a good safety measure. Using a fire extinguisher specifically designed for use on fires involving flammable liquids can help to quickly and effectively put out the flame.
“Always prioritize safety when handling hot charcoal grills. Avoid pouring water directly on the coals to prevent injuries or potential damage.”
Remember to Dispose of Charcoal Safely
Once the coals have cooled completely, it’s important to dispose of them properly. Avoid throwing them in a regular trash bin, as they can potentially reignite and cause a fire. Instead, consider these options:
- Bucket of sand: Submerge the cooled charcoal in a bucket of sand to prevent any risk of fire.
- Metal container: Use a metal container with a lid to store the cooled charcoal until you can safely dispose of it.
By following these precautions, you can enjoy the art of charcoal grilling while ensuring the safety of yourself and those around you.
How to Set a Weber Gas Grill for Indirect Heat
Grilling is a beloved pastime in the UK, especially during summer months. While direct grilling is great for quick cooking, there are times when you need to use indirect heat to achieve the perfect results for certain dishes. Indirect heat is ideal for cooking larger cuts of meat, roasts, or delicate foods that require longer cooking times without direct flame exposure. In this article, we will guide you on how to set up your Weber gas grill for indirect heat.
Gather the necessary supplies
Before starting, make sure you have all the necessary supplies:
- Your Weber gas grill
- A fuel source, such as propane or natural gas
- High-quality grilling utensils
- An instant-read thermometer
- Aluminum foil or a drip pan
Prepare the grill
Follow these steps to prepare your grill for indirect heat:
- Clean the grates thoroughly with a grill brush.
- Remove any debris or ashes from previous grilling sessions.
- For a two-burner grill, light only one side. For a three-burner grill, light the two outside burners.
- Preheat the grill to the desired temperature, usually around 225-250°F (107-121°C).
Create the indirect heat zone
Once the grill is preheated, it’s time to create the indirect heat zone. Follow these steps:
- Place a drip pan or aluminum foil directly under the burners that are not lit. This will catch any drippings and prevent flare-ups.
- For a two-burner grill, place the food on the unlit side. For a three-burner grill, place the food in the center, away from direct heat.
- Close the lid to ensure the heat circulates evenly around the food.
Remember to periodically monitor the temperature with an instant-read thermometer to ensure your food is cooking properly. With these simple steps, you can easily set up your Weber gas grill for indirect heat, allowing you to prepare delicious meals with ease.
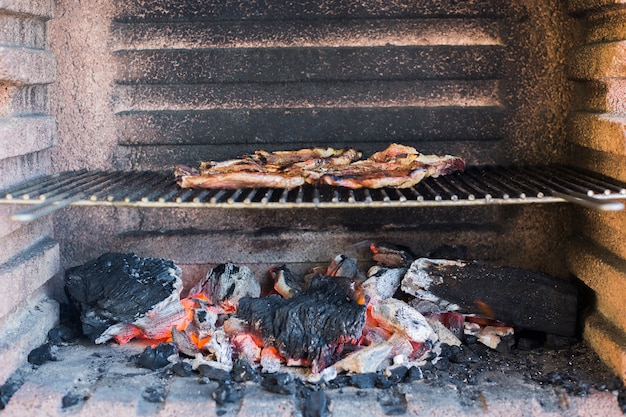
Indirect grilling is perfect for achieving tender, smoky flavors in slow-cooked meats like ribs or brisket.
Conclusion
Indirect grilling with charcoal is a fantastic technique for achieving tender, evenly cooked dishes with a delightful smoky flavor. By following the steps outlined above and implementing the tips provided, you can elevate your outdoor cooking game and impress your guests with mouthwatering meals. So, fire up your grill, get your charcoal ready, and enjoy the wonderful world of indirect grilling!