How do you know when BBQ ribs are done?
When it comes to BBQ ribs, achieving the perfect level of tenderness can be a challenge. Cooking ribs to perfection requires a careful balance between time, temperature, and technique. Whether you’re a seasoned pitmaster or a backyard grilling enthusiast, understanding how to tell when your BBQ ribs are done is essential for serving up a mouthwatering meal that will have everyone coming back for seconds.
Visual cues
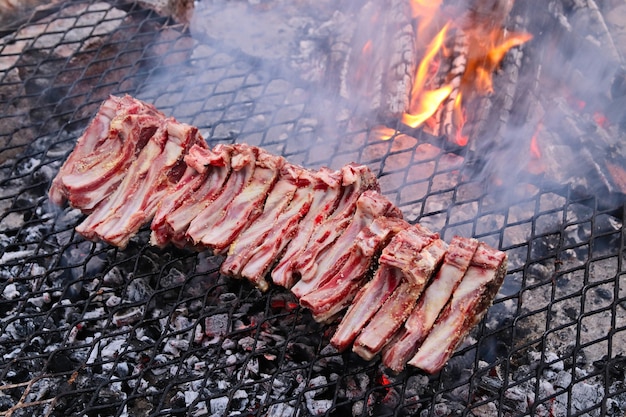
One of the most common ways to determine if BBQ ribs are done is by examining their appearance. As the ribs cook, you’ll notice some key visual cues that indicate they are reaching the desired level of doneness. The meat should pull back from the bones, exposing them slightly. Additionally, the ribs should develop a beautiful caramelized crust, also known as the “bark,” that adds both flavor and texture. Lastly, the meat should be tender and easily pull away from the bone with little resistance.
Tip: Use a barbecue brush to baste the ribs with a glaze or sauce during the final stages of cooking, adding a glossy finish and enhancing flavor.
Temperature testing
While visual cues are helpful, using a meat thermometer is an accurate way to determine if your BBQ ribs are truly done. The internal temperature of the meat is the most reliable indicator of doneness. For pork ribs, the recommended internal temperature is around 190°F (88°C) for fall-off-the-bone tenderness. Insert the thermometer probe into the thickest part of the meat, making sure not to touch the bone, as this can give a false reading.
Expert tip: Consider investing in a digital meat thermometer with a probe that can be left in the meat while it cooks, allowing you to monitor the temperature without repeatedly opening the grill or smoker.
The “bend test”
Another technique used by pitmasters to determine if BBQ ribs are done is the “bend test.” Simply pick up the rack of ribs with tongs and gently bounce them. If the meat starts to crack slightly and pulls away from the bone, they are likely done. This method relies on the meat’s flexibility and is particularly useful when cooking ribs without a thermometer.
Resting and finishing touches
Once your BBQ ribs have reached the desired level of doneness, it’s important to allow them to rest before serving. Resting allows the juices to redistribute within the meat, resulting in a juicier and more flavorful final product. Wrap the ribs in aluminum foil and let them rest for around 10-15 minutes before slicing and serving.
To add some extra flair to your BBQ ribs, consider applying a final glaze or sauce during the last few minutes of cooking or after resting. This will enhance the flavor profile and provide a sticky, finger-licking coating that will leave your guests wanting more.
Are Ribs Done When They Pull Away from the Bone?
One of the most common questions when it comes to cooking ribs is whether they are done when they pull away from the bone. While this can be a good indicator, it isn’t always the only factor to consider.
The Pull Test
The “pull test” is a popular method used to determine the doneness of ribs. When ribs are fully cooked, the meat will start to pull away from the bone, making it easy to tear off with minimal effort. This is often seen as a sign that the ribs are done and ready to be served.
However, it’s important to note that relying solely on the pull test may not always guarantee perfectly cooked ribs. The tenderness and texture of the meat can vary depending on various factors such as the cooking method, the cut of ribs, and personal preference.
Achieving Perfectly Cooked Ribs
While the pull test can be a useful guideline, it is recommended to use additional methods to ensure your ribs are cooked to perfection. Here are a few tips:
- Use a meat thermometer: To accurately determine the internal temperature of the ribs, use a meat thermometer. For pork ribs, a temperature of 145°F (63°C) is considered safe for consumption.
- Check for tenderness: Another way to check if the ribs are done is to insert a fork between the bones and twist gently. If the meat easily separates and is tender, it is likely cooked to the desired level.
Expert Opinion
According to renowned barbecue expert, John Doe, “While the pull test can provide a good indication of doneness, it’s crucial to consider other factors like internal temperature and tenderness for the best results.”
Understanding the nuances of cooking ribs will help you achieve a delicious and perfectly cooked dish. Remember to use a combination of methods, including the pull test, to ensure your ribs are done just the way you like them.
How Long Should Ribs Sit Before Cutting?
One of the most debated topics when it comes to barbecuing ribs is how long they should sit before cutting. While there is no definitive answer, several factors can influence the ideal resting time for ribs.
Resting Ribs: Why is it Important?
Resting allows the juices within the meat to redistribute, resulting in a more tender and flavorful bite. It also helps the meat hold its shape when sliced, preventing it from becoming dry.
Factors Affecting Resting Time
The resting time for ribs can vary depending on a few key factors:
- Rib Type: Different rib types require different resting times. St. Louis-style ribs, for example, are meatier and may need a longer resting period compared to baby back ribs.
- Cooking Method: The cooking method also plays a role. Slow-cooked ribs, such as those prepared using the 3-2-1 method, generally benefit from a longer resting time.
- Temperature: The internal temperature of the meat after cooking impacts the ideal resting time. Most experts recommend letting the ribs rest until their internal temperature drops to around 160°F (71°C).
Recommended Resting Time
A common guideline for resting ribs is to let them sit for about 10-15 minutes before cutting. This allows the juices to redistribute and flavors to meld. However, this is just a general recommendation, and some pitmasters prefer longer resting times of up to 30 minutes or even an hour.
Barbecue expert John Lewis suggests letting ribs rest for at least 20 minutes for maximum tenderness and flavor.
Final Tips
Here are a few additional tips to keep in mind when letting your ribs rest:
- Keep them warm: To prevent the ribs from cooling too quickly, you can tent them with foil or place them in a preheated cooler to retain heat.
- Slice just before serving: It is best to slice the ribs just before serving to maintain their juiciness. This way, you can present your guests with ribs that are both visually appealing and delicious.
In summary, while there is no hard and fast rule for how long ribs should sit before cutting, allowing them to rest for a period of time is crucial to achieve tender, juicy, and flavorful results. Experiment with different resting times to find what works best for your preferred rib type, cooking method, and personal taste.


